

Audiobus: Use your music apps together.
What is Audiobus? — Audiobus is an award-winning music app for iPhone and iPad which lets you use your other music apps together. Chain effects on your favourite synth, run the output of apps or Audio Units into an app like GarageBand or Loopy, or select a different audio interface output for each app. Route MIDI between apps — drive a synth from a MIDI sequencer, or add an arpeggiator to your MIDI keyboard — or sync with your external MIDI gear. And control your entire setup from a MIDI controller.
Download on the App StoreAudiobus is the app that makes the rest of your setup better.
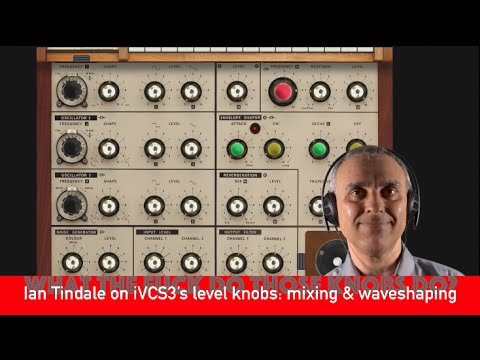
WTF Do Those Knobs Do in iVCS3

What The Fuck Do Those Knobs Do in iVCS3?
This time, the levels knobs in iVCS3. I look at how mixing the oscillator waveforms can also be extended into a rudimentary means of waveshaping.
Thanks very much to the forty people who looked at my last WTFknobs video over the past fortnight (although most of those would have been me). As before, anything you can do to fave, pass it on, retweet, etc would be gratefully appreciated, and let’s hope this one achieves the same heights of acclaim as the preceding one.
Comments
Love it.
Thank you and do more iVCS3, professor!
I want to learn it all.
Thanks, @u0421793.
At best I understood 50% of it, but it was fascinating nonetheless.
You may jest, but when I did my Korg Mono/Poly tour, I went to bed at night and could hear a constant cross-modulated FM-sync sound in one ear all night. At this age you’ve got to be careful with headphones and tinnitus — it can become a serious problem.
Nice explanation @u0421793. Much appreciated.
Thank you Ian, you inspired me to try to get control of this app that has a lot of variables and I hadn't touch for quite some time. I hope I knew more about electronic sound , but your explanation opened some doors for me.What I don't see clearly is the ins and outs in the box.In is shown in both the top and left of it. Maybe an explanation of Signal input,Control input,Treatments,Sources,Input channel,Output Channel within Signal Input,etc and the sound flow would be beneficial to get more advantage of your explanation?.Another question would be: is there an ideal electronically wave shape that we are trying to reach when combining the oscillators? You also mentioned that the envelope can be used as an oscillator? How do you do it?It would be nice to have an oscilloscope tied to look at the shapes originated and to use them as a guide,maybe?
Thank you very much again for your explanations, and I hope you continue enlightening us in our musical quests.
To be honest, to get a good overview of the whole synth in a tutorial style, the Digital Jeepney series is excellent for such an understanding, and I’d recommend starting here. What I’m doing with WTFknobs is fairly self-indulgent and narrow in that I’m picking literally a few knobs (was originally going to be one knob but that’s an unhelpful restriction) and pursuing pretty much only one facet, but deeply.
Many synths have unfamiliar corners which people just gloss over, or pretend they know what it means (like when people hear on the news the word “systemic”, as in “systemic failure” — nobody goes and looks it up, it sounds near enough to something they know, so everybody just nods and smiles). Sometimes even after years of routine usage of the rest of a synth, a person may break down and admit they don’t know what that mystery area really does, inwardly exclaiming “what the fuck do those knobs do”?
My pieces in this series are too narrow to be considered tutorials. I’m not even covering all the basic concepts. So many synths come out that are really too close to each other architecturally (maybe for fear it won’t sell if it is ‘different’), which encourages the same old expectations, hence many owners just deploy the same old usages. My main impetus is to raise awareness of ‘more than’ just routine synthesis technique, but doing it one handful of knobs at a time (and we all know that more than a handful of …er, never mind).
While I’m here I can quickly glossary a few of these terms you mentioned:
Signal input — an audio range frequency that passes into and through a module — i.e., sound signals.
Control input — much lower rate change of level to apply to a modulation or ‘treatment’ of some aspect of the audio passing through a module — i.e., such as LFO, envelope transients, or even the keyboard or sequencer control levels.
Of course, you can abuse this as much as you like, and put control levels into signal inputs (but you’ll hardly hear anything at all, it is below audio range — ah, but wait, if you add a slow changing level to an actual audio range signal, mixed together, you’ll ‘crush’ or ‘push’ the available range that the audio signal could traverse, thus changing it in some detectable way, so that was not a waste of time after all!). Similarly, you can use audio where a control level would normally go, and, well, try it out! FM synthesis uses this all the time — frequency modulating one audio range oscillator with another audio range oscillator! There’s no rules. There’s a lot of patches that will produce nothing, but you won’t get sent to prison or have the synth catch fire for patching anything anywhere. An experienced synthesist is likely to avoid ‘stupid’ patches that a newbie might accidentally make, and in doing so, fail to discover some quite unique accidents.
Treatments — what you can do “to” a sound to make it “different” to how it originated (i.e., a filter ‘treats’ the sound of an oscillator by altering it).
Nice vid, thanks
Thank you Ian, you are raising our awareness...and thank you for your explanation e information.I'll be eagerly waiting for your next tutorials.
@u0421793 A good addition sir. By the by, very nice simple clean green screenage; do you have something fancy or have you found a simple crack/hack?
Ah, the “making of” story. It took all bloody day as usual to set up and watch everything fail repeatedly to work together. All day, before I’d even said one word! It had even got dark out, and this is midsummer.
This time I decided to break from the way I’d been doing online video for the past years, and not do it “live”.
Previously I have promoted a “no post-pro” approach that could almost have been live broadcasts (if someone were to connect the program feed to an uplink) in that everything is switched live and all that is required is to capture it with zero actual editing (apart from maybe top and tail it).
For the previous Nave one, I was using a Panasonic V720 camcorder, but not recording, only for the clean HDMI output. The iPad 2 HDMI via splitter into a TV-One Corio 1T-AVPC-HDMI scaler (to convert to HD50i) and then those two video signals into a BlackMagic ATEM Television Studio. My audio was Sony MS-902 into the Panasonic V720 cam. I was standing against a near-white painted bedroom wall, lit by two LED panels, and my face was also lit by two smaller LED panels (too directional, leaving unexpected ‘pools’ of shadow in a way that normal lighting doesn’t). My background burned out by exposure, I was lumakeyed on the ATEM upstream keyer, the lower-thirds intro graphic on the downstream keyer (fade once at the start, I paused to look down). The post-pro was merely top and tail and compress voice audio in FCPX. That live approach I was using hitherto is excellent as I can see the live output on the multi-view monitor, and because the program output I see is exactly what is on air I can actually point to parts of the synth behind me in real time. The iPad 2 30-pin HDMI adaptor would prefer to output 1080p59.98 despite being in Europe Britain which like most of the world uses the 25/50 frame rates that the rest of my gear works at [1].
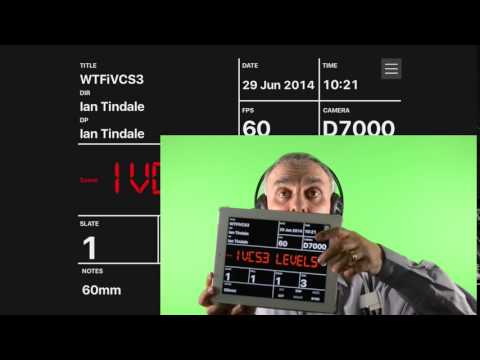
This time, for WTFknobs iVCS3, I decided to keep the iPad trying to be 59.98Hz (which is what 60Hz usually is at broadcast level), and see what I can rustle up that can shoot me at that frequency (which counts all my camcorders out). The ATEM can do 1080i59.98 which is interlaced, not progressive and the iPad will try and be progressive unless I fool it with a splitter. I have a camera, my old Nikon D7000, that can shoot 720p59.98 but doesn’t have clean HDMI output. I can’t live mix 720 and 1080, but I can composite them in post production in FCPX.
I used my Micro-Nikkor 60mm lens (an amazing lens for video btw), set the colour profile (i.e. a tonal response transfer curve) to Portrait, used a lastolite hi-lite with a chromakey green ‘bottle top’ over it, lit with pair of LED panels to slightly burn out, and lit my face with smaller LED panels which again are too prone to off-axis dark areas. An AKG lav mic into the PPA (phantom power adaptor) into the A+H Zed 10 mixer into a Mac by USB. My iPad 2 HDMI into another Mac by a selection of either BlackMagic Ultrastudio Mini or BlackMagic Intensity Shuttle (thunderbolt), and also combinations of Blackmagic HDMI / SDI converter, or cheap chinese HDMI to SDI converter to cheap chinese SDI to HDMI converter. In each case, over and over and over, the bloody iPad would work, then not work — when I had to stop for whichever reason because something else was being obtuse, I’d start again exactly the same with nothing altered and nothing touched, the iPad would decide not to emit usable video. Took all bloody day, this did. Infuriating. The iPad HDMI output is unreliable for broadcast spec usage (it probably isn’t the iPad 2 itself, but the 30-pin HDMI adaptor).
I was about to pack up, at the last minute I decided to use an Elgato HD60 to at least capture the iPad video while I capture my own video on the Nikon SD card. The Nikon D7000 doesn’t have clean HDMI output, only very low res live video with the camera overlays permanently on it (hence not useful for live video switching). That’s how I did this one – the WTFknobsiVCS3: Nikon D7000 + 60mm lens on tripod shooting me green screened, and separately capture iPad + my audio (from Zed 10 mixer) on the Elgato HD60, then synced up later in Final Cut Pro X. I switched off spatial conform for my own image, as otherwise it’ll try and fit 720p60 frameage over the top of 1080p60 by making them fill the same size. I only wanted to occupy the bottom corner, so spatial conform ‘off’ left the actual 720 lines my own video was using to be positionable within the bigger frame of the iPad imagery.
So, in a nutshell, that was how it was done. I’m still searching for that setup which allows me to quickly step in, do the vid, step out and upload the result. This is the opposite.
[1] Although I would argue now there’s no need to have television transmission frame rate related to a nation’s power supply frequency, especially now with LED or CFL lights which no longer produce banding if you shoot at 30fps lit by 50Hz lights. We should take the opportunity when we go to 4K tv (and we should go to 4K tv not because of higher res, but because 4K tv with 3D frame packing now has enough res to work well) to settle on a worldwide online digital frame rate, which would have to be 30/60Hz because most handheld gear works with that rate (phones, tablets, etc).
Well, that's confirmed that it must all be very difficult and tricky and involve more boffinery than ordinary folk are likely going to try. Or me. But I must say again, whatever you did or didn't do, the end result looks really very good.
By the way, anyone trying this at home, you’ve got to have a way to sync the video of sound from the iPad with the video of sound coming from your mouth. Here’s one way, which is an app I use on the iPad (digislate, but have to hold iPad upside down).
https://itunes.apple.com/gb/app/digislate/id805684949?mt=8
This is my camera 720p sitting on top of the iPad 1080p in FCPX, when spatial conform is turned off and I’m moved to one corner, but not keyed yet.
(although I didn’t use visual sync, I used FCPX sound sync)
+1